- Published on
Integrating Sentry releases with React using BitBucket pipelines
- Authors

- Name
- Talha Tahir
- linkedin @thetalhatahir

Today i am going to tell you how to integrate Sentry with ReactJS and further publish Sentry Releases to enhance issue tagging.
Lets enlighten you!

Before we begin, i have setup React using CRA (*Create React App) *and i use yarn as my package manager ( recommended by Facebook )
1- Install Sentry browser plugin
yarn add [@sentry/browser](http://twitter.com/sentry/browser)
Once installed. You need to initiate sentry before you load your App so that it start listening for errors.
In App.js do the following:
if (process.env.REACT_APP_SENTRY_DSN) {
  Sentry.init({
    dsn: process.env.REACT_APP_SENTRY_DSN,
    environment: process.env.REACT_APP_ENVIRONMENT,
    release: process.env.REACT_APP_BITBUCKET_BUILD_NUMBER,
  })
}
dsn is your project dsn available under sentry project settings and environment is your build environment : development, production, staging.
release is a string which represents your current build number. Since we would be using bitbucket pipelines so i would tell you later how to get this dynamic build number to your React code.
Now in order to catch exceptions, you need to Add Sentry to your ErrorBoundary.js like this:
import React from 'react'
import * as Sentry from '@sentry/browser'

class ErrorBoundary extends React.Component {
  constructor(props) {
    super(props)
    this.state = { error: null, errorInfo: null }
  }

  componentDidCatch(error, errorInfo) {
    this.setState({ error, errorInfo })
    Sentry.captureException(error)
  }

  render() {
    const { error, errorInfo } = this.state
    const { children } = this.props

    if (errorInfo) {
      return <div>Something went wrong</div>
    }

    return children
  }
}

export default ErrorBoundary
2. Generate Sentry Auth Token
Go to https://sentry.io/settings/account/api/auth-tokens/
Generate an auth token which is required to authorize your pipeline code to make a release on sentry.
Note: This Auth Token is different from other API tokens generated in sentry.io and is only available at the above link. Please do not confuse it with them*
3. Add variables to bitbucket deployment settings
You need to add following variables to your pipeline settings with their values so that sentry-cli can access them.
SENTRY_AUTH_TOKEN = your - token - value

SENTRY_ORG = your - sentry - organisation - name

SENTRY_FRONTEND_PROJECT = your - sentry - project - name

SENTRY_BACKEND_PROJECT = your - sentry - project - name
Note: If you have a single Project in Sentry to which you want to send errors then simply add SENTRY_PROJECT . I am using two Sentry projects, one to log backend/API errors and the other to log Frontend/React Errors.
4. Add Sentry-cli commands to your Bitbucket Pipeline.
In your pipeline, add the below step, which should be the first step in your pipeline:
    - step:
       name: Sentry Release
       image: getsentry/sentry-cli
      script:
       - sentry-cli releases -o "${SENTRY_ORG}" new -p "${SENTRY_BACKEND_PROJECT}" -p "${SENTRY_FRONTEND_PROJECT}" "${BITBUCKET_BUILD_NUMBER}"
       - sentry-cli releases -o "${SENTRY_ORG}" set-commits --auto "${BITBUCKET_BUILD_NUMBER}"
Now the next step is to pass the auto-generated BITBUCKET BUILD_NUMBER to your React build compile command. In this way you are able to provide the bitbucket build number to your Sentry.init function.
    - step:
    name: Build React
    image: node:10.16.3
    caches:
       - node
    script:
       - cd frontend/
       - yarn install
       - REACT_APP_BITBUCKET_BUILD_NUMBER=${BITBUCKET_BUILD_NUMBER} yarn build
Now we need to finalize the Sentry Release by adding this step to the last section of our pipeline script.
    - step:
    name: Finalize and Deploy Sentry Release
    image: getsentry/sentry-cli
    script:
      - sentry-cli releases finalize "${BITBUCKET_BUILD_NUMBER}"
      - sentry-cli releases deploys "${BITBUCKET_BUILD_NUMBER}" new -e "production"
and thats it!
Note: argument is used to define the environment : production, staging, development.
Viewing releases in Sentry:
Go to your Sentry Dashboard -> Releases
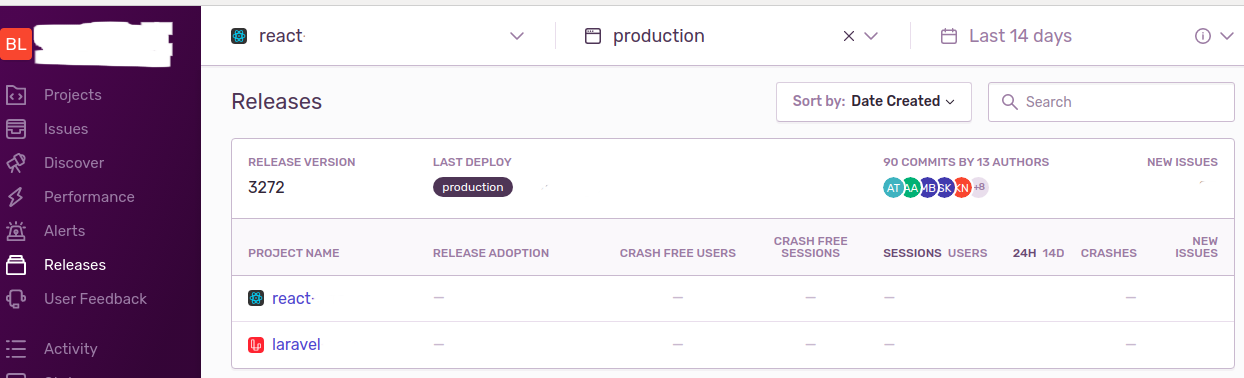
And you can see your first Sentry release 😃